
OVH template uses MBR for disk partitioning which has a limitation of an inability of utilizing more than 2 TB disk space of the single drive. We’ll illustrate the problem with an example and suggest its solution.
Suppose, you have 4 TB hard disk drive but MBR disk partitioning can only detect the maximum size to 2 TB. So you won’t be able to utilize the remaining 2TB as it is not detected by the system.
Even if you have multiple physical disks in your server, RAID will combine them into the single virtual hard drive which cannot use more than 2TB space.
This was the issue we faced on OVH dedicated server. After you install Windows OS from OVH template, it will show only one partition having 2 TB space and rest will be shown as unallocated. You cannot use this unallocated space to expand the C drive or create a new partition.
To fix this issue, you’ll have to convert the disk into GPT partitioning which supports more than 2TB disk space. Since the OS would be already installed on the same disk, you are not allowed to open diskpart and convert the disk into GPT. Take following steps to overcome this problem. Be cautious while you perform these steps as they are really tricky.
Download and copy gptfdisk to the partition where you’ve installed Windows Operating System. It’s C drive in our case.Now, login to your OVH panel manager and boot your server in Windows Rescue Mode. To apply the changes into effect, reboot your server.


Login to your server from IPMI console or VNC. You should have received the login details in your email account for IPMI/VNC.

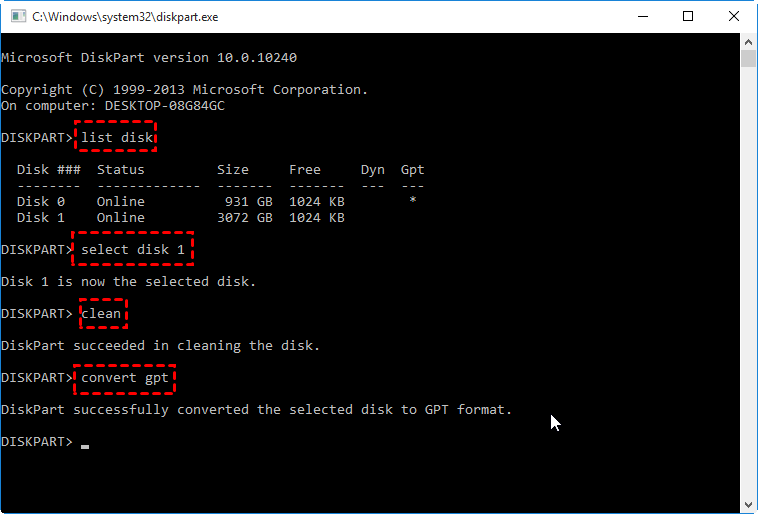
Once you are logged into your server through IPMI, open Windows command prompt and Disk Parted command prompt and keep them open.On the next step, we’ll have to determine the ID of the disk which needs to be converted to GTP. To achieve that, open disk part command prompt and type following command. In our case, disk ID is 0 and it’s not GPT else you would see * under the GPT option.list disk

Open a command prompt and navigate to your system partition where we have saved gtpfdisk.exe. Run following command.You can see it’s MBR only. Type Y to continue. gtpfdisk -l <disk ID>

Type W to commit the changes.

Now, check the disk status by running below command from diskpart prompt. You’d see it showing GPT now. list disk

Now, we need to create EFI system partition(EFS) so that UEFI(firmware of the system) can read files stored on the partition. Open disk part command prompt and run below commands.
DISKPART>select disk 0 (Replace 0 with your disk ID)
DISKPART>list partition
DISKPART>create partition efi size=2048


- Login to your server from IPMI console or VNC. You should have received the login details in your email account for IPMI/VNC.
- Once you are logged into your server through IPMI, open Windows command prompt and Disk Parted command prompt and keep them open.
- On the next step, we’ll have to determine the ID of the disk which needs to be converted to GTP. To achieve that, open disk part command prompt and type following command. In our case, disk ID is 0 and it’s not GPT else you would see * under the GPT option.
list disk - Open a command prompt and navigate to your system partition where we have saved gtpfdisk.exe. Run following command.You can see it’s MBR only. Type Y to continue.
gtpfdisk -l <disk ID> - Type W to commit the changes.
- Now, check the disk status by running below command from diskpart prompt. You’d see it showing GPT now.
list disk - Now, we need to create EFI system partition(EFS) so that UEFI(firmware of the system) can read files stored on the partition. Open disk part command prompt and run below commands.
DISKPART>select disk 0 (Replace 0 with your disk ID) DISKPART>list partition DISKPART>create partition efi size=2048Note : 500 MB is sufficient for boot partition however, I have created 2 GB partition since, I have 3.7 TB disk space. - You can see EFI partition if you run below command.
list partition - Now we will have to format EFI partition with FAT32 and assign the drive letter.
DISKPART> Select partition 3 (Replace the partition ID accordingly) DISKPART> format fs = fat32 quickDISKPART> assign letter Z:Note: BE CAREFUL WHILE SELECTING THE PARTITION. YOU MAY LOSE YOUR DATA BY SELECTING INCORRECT OPTION - Now, we need to move boot files to EFI partition which can be achieved by the below command. Change the drive letter according to your environment.
DISKPART> bcdboot c:\windows / l en-us /s z: /f - Now, we’llhave to disable the legacy boot option and enable EFI from BIOS menu. To open bios in OVH dedicated server, reboot your server and keep the console open. Once it starts booting, Press ESC key pressing after the RAID has been initialized.
- Now Go to Boot –> Boot mode Select –> Select UEFI.
- Change the first boot order from UFEI Hard disk:UEFI OS. Save and Exit.
- Now change the Netboot option from OVH manager to boot from HDD.
You can now create the new partition from unallocated space and utilize full disk space as we changed the partition type to GPT and made EFI system partition to load boot files on it. Then, we applied BIOS settings to make that partition detectable by the system. We would love to hear your feedback on the comments section.